How Much Does it Cost to Render/Pebbledash Walls?
Job Costs
| Job | Description | Labour |
| 1 | You want all the 3 walls of your semi, rendered. So to prepare the walls properly do the 3 coat job with PVA and waterproofer, then clear up. This will take 3 men 7 days (2 spreads and 1 labourer). The scaffolding will cost £750, materials £425, the labour £3000. | £3150 |
| Plus materials, scaffolding etc for the above | £1175 | |
| 2 | Same job but with pebble dash. This will be more expensive purely because of the cost of the “dash”. The labour is about the same. | £4475 |
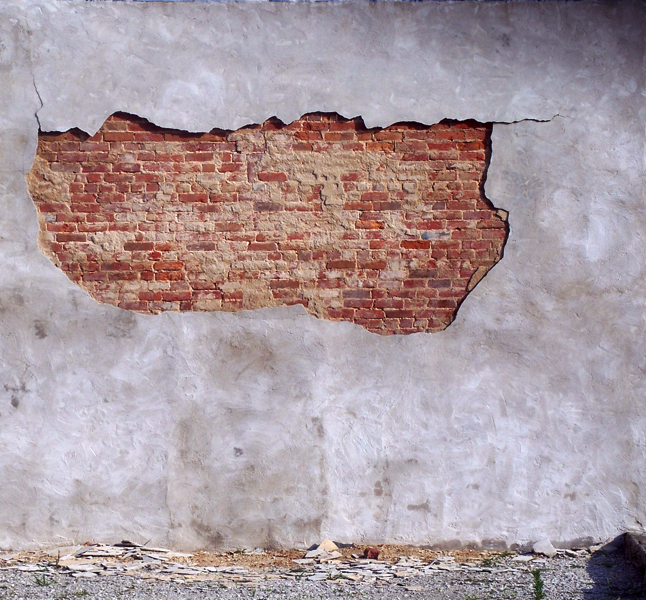
| 3 | The render, either dashed or otherwise is “blown” (has become loose) and is actually coming off on one badly weathered wall of your house and you want it repaired. Do you really want to end up with a patchwork quilt? Because that’s what you’ll get! With the best will in the world no builder can do invisible mending, every bit he repairs will show. Bite the bullet and do the whole wall. This will take 3 men 3.5 days, (not all the stuff will want to come off the wall, so it will have to be belted off with mechanical hammers). | £1575 |
| Plus materials, scaffolding etc for the above | £700 | |
| 4 | You want the 3 sides of your single storey brick extension prepared properly then rendered. This will take three brave soldiers 3.5 days and will not require scaffolding. | £1575 |
| Plus materials, etc for the above | £100 |
Information Sheet on Rendering and Pebble Dashing
Render
Rendering is effectively spreading mortar all over the brickwork and leaving it flat and smooth, with nice sharp corners and edges, usually formed using metal beading.
Historically, this task was undertaken to keep the rain out and one of the first forms of render would have been around a millennium ago, back in the days of wattle and daub. When bricks were first used for building, they were handmade and left a bit to be desired in the waterproofing department and so houses were often rendered in an attempt to repel the rain.
Older houses remain rendered. It is a mammoth task to remove it once it’s on. In certain areas of the country, rendering has become a traditional feature and the colours used to paint the finish are also traditional. Sometimes it may be just one colour which is typical of an area, or it may be a particular colour palette that is the feature.
However, it is not just old houses that are rendered. A conventionally constructed new build may be finished with a render coat if, as just mentioned, it falls into a geographical area of traditionally rendered houses. Alternatively, if a new build is constructed from blockwork rather than brickwork, then it’s finish will likely be render.
Sometimes circumstances will dictate that a house that was originally built from brick may benefit from the application of a coat of render. This would likely be due to the deterioration of the original brickwork, which may have become spalled (exfoliated), or may have started letting in water or it may just look unacceptably tatty!
What is render made from?
The original rendering mortars (after daub) were mostly sand and lime, then sand, cement and lime and now, unless it’s a specialist job on stone for instance, may just be sand and cement. The addition of some lime makes the render more workable and reduces cracking when it dries.
It’s important that washed sand is used in rendering mortar as this means that all the sulphates which would otherwise eventually ruin the render have been removed. Depending on the finish required, finer sand may be used for the top coat than for the base coat.
Ideally the muck (builder’s parlance for mortar) goes on the wall in three coats. Traditionally these are called the render/scratch coat, float coat and set coat. Nowadays, it is more usual for just two coats to be applied. If they’re thick enough, scratched properly, are of the correct strength and have the right additives in them, that’s good enough. The strength of each coat (the ratio of sand to cement powder and lime), is very important and will vary depending on the type of brick or stone it’s being applied to. Too strong a mix for the background may result in cracking.
Preparation
Firstly, the surface of the wall to be rendered should be hosed down to remove dust and loose particles. This includes any old flaking paint and render which should be scraped away. Next, the brick or stone or whatever forms the surface of the wall being rendered, must be seriously roughed up (or keyed) before the spreading begins. A trowel can be used to scratch lines in the surface and sometimes it means knocking out the pointing or even taking an angle grinder to the wall and scoring it hundreds of times (that’s a job for the hard men).
If the wall isn’t properly keyed the render WILL fall off!
Additives
Things to put on the wall, or in each coat.
PVA adhesive
This can be diluted quite a lot and toshed onto the wall after it has been cleaned down to seal all the remaining dust. Then just before laying the muck on, a much stronger dilution can be brushed on, left to go tacky and then rendered over. This will seriously help stick the muck to the wall.
PVA is also used on very porous surfaces such as aerated blocks and old bricks to slow down their ability to suck up water. Mortar sets and bonds to walls because of a chemical reaction called hydration. If a base material is too dry and sucks the water out of the mix too quickly, this chemical process is messed up, the cement and sand don’t bond and it all falls off.
Waterproofing Agent
This is a brilliant modern invention and it actually (after 500 years of trying) makes the render waterproof! It goes into the base coat and because it won’t let water in (or out), an added advantage in hot weather is to slow down the setting process and stop accelerated drying and subsequent cracking. It is also added to the finish coat to really waterproof the stuff and give the “Spreads” (aka Plasterers) more time to get the finish right.
Don’t skimp on the waterproofer. Good brands (like “Sikka”) are expensive (£45 for 5 litres). Cheap ones (£10 for 5 litres) are about as much use as a chocolate fireguard.
Air Entraining Agents
These, as the name suggests (if you happen to be emeritus professor of advanced gobbledegook at Oxford), coax lots of air into the muck as its being mixed. Air makes it lighter and easier to trowel on the wall. They also aid the render’s long-term performance.
Acrylic Render
This is premixed with additives (such as those above) and the mixture will vary depending on the situation. They can improve water resistance, flexibility and adhesion. They may also have a smoother finish than traditional renders and some can be applied to a wider variety of surfaces such as cement sheeting and specialist exterior cladding.
Acrylic render only takes two days to dry, which is a vast improvement on the time taken by traditional render.
Three Coats
Scratch (or Render) Coat
This coat will be the thickest and strongest of the three and will be scratched, as it begins to dry, with lots of deep lines. This gives a good key for the next coat and also provides stress relief lines during drying. An average thickness for this coat is around 12mm.
Float Coat
This is put on next and will be a bit thinner and weaker and it too will be scratched.
Set Coat
This is the final one which shows and should be left flat and smooth (with the desired look). This, once again, should be a little thinner than the previous coat. Too thin and all the mortar lines (beds) in the brick or block work underneath will show through. This is called grinning.
Finishes
Different tools such as trowels, brushes and sponges can be applied to the final coat as it dries to affect its appearance and texture. A plasterer may have his own particular preference or style, so make sure you have the conversation with him first!
There are also pigmented finishing coats that can be rolled, trowelled, sponged or sprayed on. A variety of patterns and textures and can be achieved including stippling, glistening or lime wash effect.
Pebble Dashing
Dashing…….It’s a bit of an art. It’s very easy to get it horribly wrong as well, so make sure your chap knows what he’s doing. It is a technique which can cover up faults in the final render coat and it can also provide a strong, relatively maintenance free finish to a wall. There are various types and colours of pebble so have a look around and see which you like best. He will probably mix lime with the final mortar coat, this traps a lot of air, makes it lovely and light and better still, lovely and sticky. Then he can have fun chucking the pebbles at the soft mortar hoping that they stick! It needs to be both sticky and just thick enough to hold the pebble you have chosen. Too thick and the pebble can disappear, too thin and it will hit the coat underneath and bounce off.
What to ask the Plasterer during his Quotation Visit
Let’s assume that your brickwork is exfoliating (it’s called “spalling if you’re a builder). It’s happened because frost action is causing the fronts of the bricks to fall off. So you want the whole wall rendered.
Will you first prepare the bricks by removing all the existing loose bits?
Will you rake out the pointing to about ½ inch (12mm) to provide a key for the render?
Will you prime (and seal) the brickwork with dilute PVA?
Will you then apply stronger PVA just before applying the first coat?
What type of sand will you be using?
How will you be forming corners and window and door reveals?
Really they should make rounded corners as they go. They could use edging beads but if they do, make sure they’re stainless ones, set in place with their mortar, prior to starting rendering.
What strength will the first coat be?
If the wall is Victorian red or yellow stock bricks this should be 4:1. If the wall is 1930’s common facing bricks, 3:1 is better.
Will you be scratching and waterproofing the first coat?
Will you apply strong PVA just before applying the second coat?
This won’t need sealing, there should be no dust.
What strength will the second coat be?
4:5:1 for the stocks.
4:1 for the commons
Will you be adding waterproofer to the finish coat?
This will help him after all.
Which waterproofer will you use and how much is a 5 litre tub?
Where will you make the joints between areas of render?
Unless he arrives mob handed, each coat can’t be laid on all round the house in one go. This isn’t important except for the final coat. He will want to work on each lift (or level) of scaffolding at a time. This will mean two or three, horizontal layers of render around each wall of the house. No matter how good he is, the joints between these layers will show as soon as the scaffolding comes down, even if it’s been painted. You will not be happy with this!
What he should do with the final coat is this:
Work in vertical bands (not horizontal ones) and have 1 man per lift laying on the final coat. This way they work above and below each other across each wall ignoring the horizontal scaffolding levels, finishing the surface as they go, so they shouldn’t have to go back on themselves. This will always leave any stopping point (when they go home for their teas) as a vertical line.
This is easier to deal with, as its right in front of their face (as opposed to being at the level of their boots, hidden by the scaffold boards). If they have to come back and continue next day and they have stopped behind a down pipe or the toilet waste pipe which are vertical, they can begin again from behind the pipe and the joint will be hidden.
What they must not do is stop at the point of a corner. Future wall movement will exacerbate any potential cracking here. If they can’t stop at a pipe, then the short bit of vertical wall between first and ground floor windows can be used.
How will you finish the surface: troweled smooth or sponged?
Both are fine. Both can be painted.
Will you take the time to clear up properly?
Here are some potential problem areas:
Window frames and glass which may have had PVA slopped on them.
The dust (from knocking out the pointing) on paths and windows and cars – both yours and your neighbour’s.
The dropped mortar on your paths, garden, window frames, porch roof, down pipes, garden furniture, etc.
The stains on your patio where they mixed up the mortar.
As you will have gathered by now, this is inherently messy work!
FAQs 'traffic light' guide
-
What's easy about this job…
Open or CloseIt's straight-forward, hard graft for a pro.
-
What's tricky about this job…
Open or CloseDon't choose a builder. The trade is plastering/rendering. Make sure you get someone who had been recommended or you can see his work.
-
Potential problems with regards to this job…
Open or CloseIncorrectly applied render will either fall off, crack of just look like a sea of low-lying sand dunes in the Sahara i.e. awful!
For all job costs click on the appropriate section below:
all interior jobs
Click below for the building sheriff's free price guides and information sheets
all exterior (down) jobs
Click below for the building sheriff's free price guides and information sheets
all exterior (up) jobs
Click below for the building sheriff's free price guides and information sheets
www.buildingsheriff.com
Copyright The Building Sheriff Ltd 2017