All Need To Know About Cavity Walls When Building An Extension
Building Cavity Walls for an Extension
So your builder has got the trenches dug, inspected, passed and filled with concrete. It’s time to do some actual building work and the brickies will start to move in.
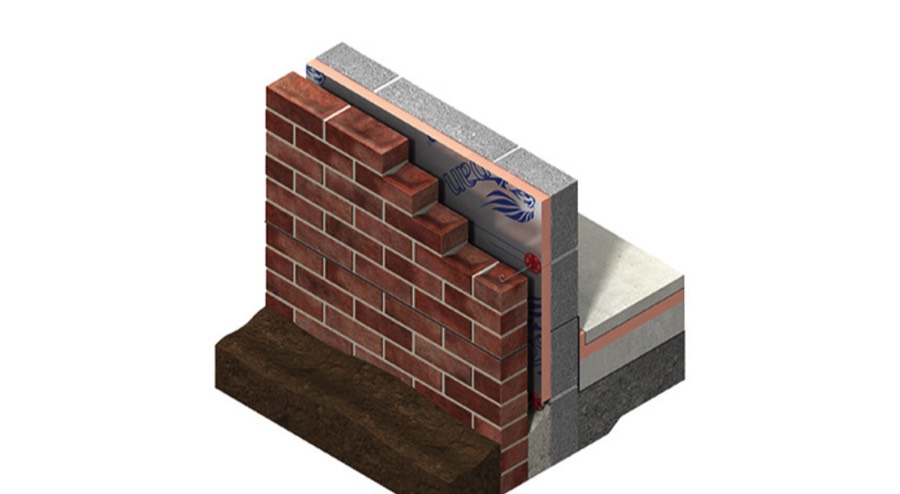
They will, in all eventuality, be building your extension in a cavity wall type construction. All this means is that two walls, leaves, skins or whatever you want to call them, will be built next to each other.
Traditional brickwork used to be solid-9 inch walls, but no matter how thick the wall, if it is permanently exposed to moisture, it will eventually let in the water. The cavity prevents this, as the water cannot get across the void between the 2 skins.
That’s the theory anyway. There’s a few things that can throw a spanner in the works and hopefully your builder and his team will sidestep them like a fat bloke would a salad.
Preventing Damp
The first is cement that is dropped between the 2 walls as the brickwork is constructed. It needs to be cleared as if it builds up, it can bridge the damp proof course (DPC) allowing moisture to penetrate. The DPC should be a minimum of 150mm above finished outside ground level by the way.
Hopefully your brickie will know this, he should do, and will clear the cavity without even thinking about it. But he might be a bit tired, inexperienced, hungover or just lazy - you never know.
The problem is that if the DPC has been bridged in the cavity, the damp problem wont manifest itself until long after the brickies have gone and your Laura Ashley floral design wallpaper starts to peel and stain down by the skirting boards.
As the brickwork and blockwork skins go up, your builder will tie them together at regular intervals to stop them moving independently of each other. These ties are laid into the mortar beds.
It’s pretty straightforward and the ties do perform a very important function, but they do present the possibility of more water penetration, as water could run across them to the inner skin.
They should be stainless steel or galvanized, and they all come with a drip or twist in the middle to make sure the water, like Steve McQueen, can't get across to the other side.
Construction of the Cavity Walls
The actual construction of a cavity wall can vary a bit but each wall or leaf has to be a minimum of 90mm thick (that’s just over 31/2 inches in old money) with a cavity of at least 50mm (2 inches).
Sheet insulation material will also start to arrive and your builder will place this into the cavity as the walls go up. There are a few different makes which can be used - Celotex, Kingspan, Jablite etc and they all perform the same function.
They are easy to cut and insert although cutting Jablite will make you look as if you have just wandered in from the set of Ice Station Zebra 2. The sheet insulation is clipped in position with imaginatively named sheet insulation clips to stop it falling or leaning over and bridging the cavity.
Above any openings for doors and windows, your builder will place a lintel, and as your extension is going to be built in cavity work, he will, funnily enough, insert a cavity lintel.
There are many different designs and shapes of lintel, but a cavity lintel will have insulation inserted in it to prevent any cold spots on the inside wall which can lead to condensation problems.
He will place the lintel onto the block and brickwork either side of the opening with a minimum 150mm bearing so as to spread the load to either side of the opening.
Where the cavity wall terminates at a door frame or window frame, the cavity must be closed and the brickie will do this in brick or blockwork, but he must incorporate a vertical damp course to prevent water penetration.
He may chose to use a special cavity closer - these tend to be a bit pricey for what they are, but for his part, they are quick and easy to use.
The purpose of closing the cavity is to stop fire spreading from one part of the building to another, something that the Building Inspector is always on the look out for.
For all job costs click on the appropriate section below:
planning an extension
Click below for the building sheriff's free price guides and information sheets
extension build stage 1
Click below for the building sheriff's free price guides and information sheets

extension build stage 2
Click below for the building sheriff's free price guides and information sheets

www.buildingsheriff.com
Copyright The Building Sheriff Ltd 2019