How Much Does It Cost To Fit a Fireplace?
Cost to Fit a Fireplace
| job | Description | labour |
| 1 | Let’s start with opening up a sealed breast and fitting a “Victorian” working fire. This is usually a two part job. The builder turns up to uncover the opening, then returns 2 weeks later when you’ve bought a fire that fits. That throws up the problem of having to cover/remove everything twice. We can’t deal with this, so let’s assume the room is empty. So, the builders opening doesn’t need altering, you didn’t find a damper in the end, the old concrete hearth is still there (it usually is), you have now bought the surround and insert and he’s back to fit it. He will need to plaster around it and fit 2 annoying bits of skirting board at each side to finish the job. That’s 2 men, a day to expose the opening, then one day to fit the fire. | £625 |
| Plus the fire surround etc. for the above £125-£1000 | ||
| 2 | If you want him to alter the opening to fit the fire, add an extra day. | £325 |
| 3 | You need the existing concrete hearth size altering add …. | £110 |
| 4 | A gas fire now and the hearth and opening are the correct size and the room is cleared ready for the job. You want an ornate multi piece marble surround with a marble hearth, OOOOh I can’t wait, it’ll look lovely! A flue liner needs fitting with the correct cowl, luckily he is doing it without scaffolding. The job will take 2 men 2 days. | £600 |
| Plus the fire & surround & flue liner etc. for the above £500-£2000 |
“Labour” at £175 a day (tradesman) £100 (labourer), includes incidental fixings etc. and tipping charges. “Materials” if mentioned, are larger things (a boiler) and stuff only you can choose (tiles etc). Also VAT must be added all round.
Information Sheet on Fitting a New Victorian, Marble or Cast Iron Fireplace
Nowadays there are several different types of fire that you can have installed in your home and it may be that you are considering a change for reasons of aesthetics, economy or in order to switch to a more renewable energy source.
If you live in an older property, it was probably built with an open fire which burned coal, but over the years, a fashion-conscious predecessor could have blocked up the fireplace and maybe even removed the chimney breast.
This would likely have been done when central heating was installed and the breast removed to increase the area of the room.
Opening up your Fireplace
Unless your chimney breast has been removed, everything should still be in place for you to have a either a working or a pretend fire re-instated.
When a builder blocks up a fireplace he has to decide what to do with the rubble and other rubbish created by the process. He may be able to sell, or find a use for mantle pieces, metal inserts and tiles, but the rubble, such as concrete and bricks are usually just used to block up the flue.
When your builder comes to unblock your fireplace, the first thing he will do is remove the stuff previously used to close off the chimney. This will be a mass of rubble along with any soot which has fallen down over the years.
All this will have to be removed to reveal the “builder’s opening” and, as you can imagine, this can be a filthy job, so ask what steps will be taken to minimise the mess. (Did you notice how I didn’t dwell on the name of the hole? It’s a name I don’t like to contemplate).
At this point, if you are having a real fire, or if there is the remotest chance that you will ever want one in the future, you should get the chimney swept. The good news is that these days, an experienced chimney sweep will have the knowledge and equipment to do the job virtually dust free. Your flue will then be ready and waiting to do the job it was designed to do.
Open Fires
A flue is the venting mechanism which takes the waste gasses (in the form of heat and smoke) up and out of your house and as it’s about 250mm (10 inches) square it’s quite good at its job.
However, if there is no fire lit, the flue will still vent whatever gas is around and that will be the nice warm air in your house. This may even be expensive centrally heated air on the nights you come home late from work and are too tired to light a fire!
Consider having a damper fitted. This is a device that fits in the ‘throat’ of the chimney and shuts it off when you’re not using the fire. It’s quite important that you remember to open it when you light the fire, however, especially if you don’t want a sitting room full of smoke. A damper can cost over £100 to buy, but could save you that amount in the first year.
Open fires require oxygen in order to burn and this has to get in somehow. Double glazing is good at keeping it out so the fire will look for another source of oxygen which could be from under the floor or under the doors. This creates drafts in the room and the best way to avoid them is to have a ventilator fitted as close to the fire as possible. This can be in the floorboards which is a good thing as it seriously helps with underfloor ventilation.
If you have a solid floor and the chimney is on an outside wall it can go just above the skirting board. Failing that, it may be possible to fit a trickle vent in a door or window frame.
Closed Fires
If you decided to block up your chimney because you are positive that you will never want an open fire again, then you should fit a trickle vent in the “blocking off” material. This will vent some air up the chimney which will help to prevent the possibility of condensation staining high up on the chimney breast, due to the cold air in the flue meeting the warmer air from the room. It’s a game isn’t it?
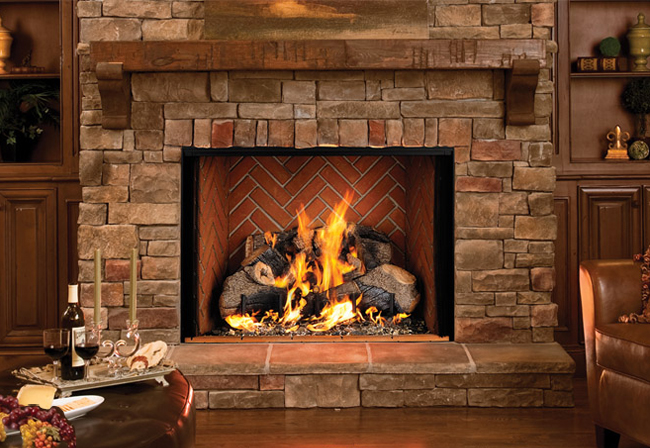
Victorian Fireplaces
Bedroom fireplaces usually come in one piece and are smaller than living room fireplaces which consist of an insert and a surround.
The surround is the clean (even shiny) bit with the mantle shelf and the tiles, the insert is the black bit which holds the fire. Even if you are not going to have a real fire, you still need both bits or the finished article will look like your granny with no teeth in!
The insert should come with the back plate, the fire basket AND (the bit that most often isn’t there) the curved casting bars which fit across the front of the basket to keep the coal in place. Try and get a surround which fits the newly exposed opening as it’s cheaper than altering the size of the opening.
The best scenario is that you sourced the surround as soon as you knew the dimensions of the opening and that the lovely, shiny, tiled beauty is in the garage when it’s time to fit it. The other option is to buy the fire first and hope the builder’s opening turns out to be the right size.
Right, the builders opening is exposed, and the damper, if you could find one, is fitted.
Hopefully the original lintel, which supports the weight of the brickwork is still in place and at the right height. This lintel usually looks like a brick arch, which is supported by curved steel. If it needs to be at a different height, the steel can be taken out and replaced with a concrete lintel placed at the correct height.
The next thing to do is sort out the hearth. Hopefully the old concrete is still there making that annoying bulge under the carpet, so you can place the new marble or slate (or more concrete) directly on top of it. This should preferably have been ordered a while ago of course.
The surround comes next, standing on top of the hearth. This should have lugs at the side for big old screws to secure it to the wall. Ideally the builder should cut away the plasterwork (if it hasn’t all fallen off by now) so that the lugs are set back into the wall and can be plastered over.
The insert is then manoeuvred past the surround and placed centrally hard up against its back. Next a load of moist sand, with some cement mixed in with it, is dumped in behind the insert right up to the top and then it is left to set. The weight of this holds the insert in place.
Now all that’s left is for the wall adjacent to the fireplace to be plastered and made good and then it’s time for your lovely wife to go and buy those dried flowers!
At this point we will assume that whatever fire you are going to fit, you are now conversant with opening up closed breasts, ventilating, damping etc., so now we will concentrate on the other types of fires you may be considering.
Gas Fires
Gas work can only be undertaken by someone who is “Gas Safe” registered and it is illegal to undertake gas installations if you do not have the required qualification. Beware those who say they have but are lying! You can check on
http://www.thegassaferegister.co.uk
First you have to get the gas to the fireplace. This can be under the floor or via the outside wall if the chimney is in the right place. Gas regulations will allow this and the copper pipe can be just clipped to the outside wall, although it may benefit from being protected by a galvanised steel shroud.
So now you have to decide on the type of fire you want and there is quite a choice these days. When you choose your fire there may be a choice of several surrounds to go with it or you may have ideas of your own. Make sure your installer can do the whole job from start to finish. The supplier will no doubt be desperate to recommend one!
Flued or Flueless?
If you have an existing fireplace and chimney, or if you plan on re-instating the fireplace, then a gas fire can be chosen to be inset into the fireplace. It will require its own flue liner. This is a long flexible tube which is shoved down from the top.
Before you go shopping, it’s a good idea to look at the existing flue. Either examine it yourself, or get in an expert. This is to make sure that the type of fire you like, is actually compatible with your existing flue, because if it will need replacing or modifying, scaffolding will need to be erected and the existing chimney pot will probably have to be replaced with an aluminium cowl. Scaffolding will add considerably to the cost of the job.
The diameter of the flue liner and design of the cowl are specific to individual fires and deviation could prove fatal or at least make the fire inefficient. The supplier / manufacturer / installer recommendations should be followed.
The type of fire you can have will be influenced by what you already have in the way of a flue/chimney and whether your preference is to locate your fire in a different spot.
Inset Gas Fire
If you already have a chimney, the age and construction type of your property will have an influence on the size and type of the flue (Class 1 or Class 2).
Either way, you will be able to choose an Inset Gas Fire
These can be of various kinds with variable levels of efficiency and heat output.
Glass Fronted Convection fires can be around 90% efficient because the glass stops them from losing heat up the chimney when not lit. They also give out the most heat at around 4.5kw.
Open Fronted Convection fires come in at around 65% efficiency and 4kw heat output.
Open Fronted Decorative fires look more natural, but are only around 50% efficient with heat output at about 3.5kw
If you have not already got a chimney, or if you want to position your fire on a different wall, or in the middle of the room even, this decision will influence the type of flue your fire will need to have and the amount of money you have to spend. Remember that all gas fires need to be vented.
Balanced Flue
If the fire is to be on an outside wall, it can have a narrow diameter Balanced Flue which fits through the wall. This is designed with an inner and an outer tube. One part brings the air into the fire and the other takes the gasses out. These fires have to be completely sealed and may have one, two, or three glass sides and may therefore appear contemporary in style.
Power Flue
If you choose a fire that can be supported by a Power Flue then you can install it almost anywhere as it is vented through narrow diameter pipes which can be routed under the floor with the gasses vented through an outside wall, assisted by an electric fan. The downsides to consider are possible disturbance with noise from the fan and not being able to use your gas fire in the event of a power cut.
Freestanding Flueless Fires
These are fitted with a catalytic converter and produce over 3 times more heat per kilowatt input than conventional gas fires and over 12 times more than ‘decorative’ gas fires. They are considered to be safe and reliable and they are quick and simple to install. They can also be much cheaper to install because there is no need for any building work to be undertaken. They come in both natural gas and LPG models and their purchase price is similar to other types of fire and of course, there is no annual chimney sweeping bill!
Condensing Gas Heaters
If you want to use the gas fire with a back boiler for water and for main heating, then you must fit a condensing gas boiler in your chimney void behind your fire. These are very efficient but require a drain pipe to take away the constant small dribble of water which is a by-product of the process. This must terminate in an existing gulley (drain) or into your soil stack (the pipe all your toilet waste disappears into) or a specially constructed soakaway…nowhere else!
Oil Fires/Stoves
These may be an option for those living in areas that do not have a gas supply.
The market for oil fires (usually called stoves, whether or not they are for cooking on) has diminished in the last few years, as several big name manufacturers have left the market, but cyclical changes in the price of oil may be set to change this. In the past, oil stoves were quite efficient, but burned with a blue flame, which the public considered to be not as aesthetically pleasing as a less efficient, yellow one. Additionally, the current fashion is for the cast iron, or steel exterior and bearing in mind that the naked flame of an oil stove has to be completely sealed, they now take a long time to begin heating a room. For this reason, it is probably good advice to switch it on in September and off in April (depending on where you live, of course!).
Oil work can only be undertaken by a bloke who is “OFTEC” registered.
Wood Burning or Multi Fuel Stoves
By this we mean one of those cast iron lumps that sit in a wide stone fireplace with closeable glass doors. They come in many different sizes with different heating potentials and you can find one to fit virtually any size of room.
They have to sit on a non-combustible plinth, the thickness of which will vary depending on the heat output of the stove and must project by at least 150mm to each side of the stove and at least 300mm infront of it.
There are many more relevant measurements and the official Regulations for Stoves (Document J)
Can be viewed on the Government Planning Portal or on your local Planning Authority.
In light of these regulations and the potential for getting things wrong, it is strongly recommended that you consult a HETAS qualified fitter, whom your supplier should be able to recommend.
Preparation Prior to the Fitting
Have your chimney swept by a qualified chimney sweep who should also be able to report on the interior quality of the chimney.
Undertake any work required to make the existing chimney structurally sound.
Arrange to have the hearth installed (after removing any old, redundant stove or fire).
Install a carbon monoxide detector as per The Regulations.
If there is a gas supply close to the area where the stove will be fitted, get a Gas Safe engineer in to take a look.
Flue Liners
Existing Chimney
It is strongly recommended that no matter how great you think your chimney is, you should still get a flue liner. It costs a few hundred pounds and compared to suffering a chimney fire, it could be a life saver. It will need to be fed down the chimney from the top and may well require you to use scaffolding.
Once the liner is in place, it just needs connecting up to the stove after the fitting of the register plate which seals off the chimney, thus reducing heat loss up the chimney. It will also prevent debris falling down the chimney and landing on your hearth!
No Existing Chimney
You can still have a stove, but it will need a more expensive internally insulated twin wall flue pipe. This can go straight up and through any floors and then appear through your roof, but of course, it is likely to be on show all the way up through your house.
Alternatively, the flue can be ‘bent’ so that it goes through an exterior wall behind the stove and then angles again into a vertical position outside, when it will continue up to an appropriately safe height. This design also adds to the cost of your project.
Things to take care of Post Installation
A smoke test will reveal any leaks and assuming there aren’t any, a test run will show if the stove is burning correctly and that the gasses are being taken up the flue efficiently.
If you haven’t used a HETAS qualified tradesman (who can certify his own work) for the installation, you should now contact the Building Control Department at your local council to send someone to certify it as being safe. Remember, that if you don’t do this and there’s a fire, your home insurance may be invalid.
Now Enjoy!
But…
If you are burning wood beware! The smoke creates a resinous deposit, which builds up on the inside of the chimney. As “the chimney” is almost always a flue liner it has to be the diameter the manufacturer specifies. Sweeping a flue liner is notoriously difficult. They bend their way up the chimney and standard brushes just won’t do it. The best solution is to have the largest recommended diameter flue and every so often burn smokeless fuel in a very hot fire. This sort of melts the deposit away.
So only use dry, seasoned hardwood.
A lot of people only burn smokeless fuel for this reason but I do like to chuck logs on. I enjoy dodging the sparks!
FAQs 'traffic light' guide
-
What's easy about this job…
Open or CloseNo problem for a specialist firm.
-
What's tricky about this job…
Open or CloseGetting the flue in.
www.buildingsheriff.com
Copyright The Building Sheriff Ltd 2017